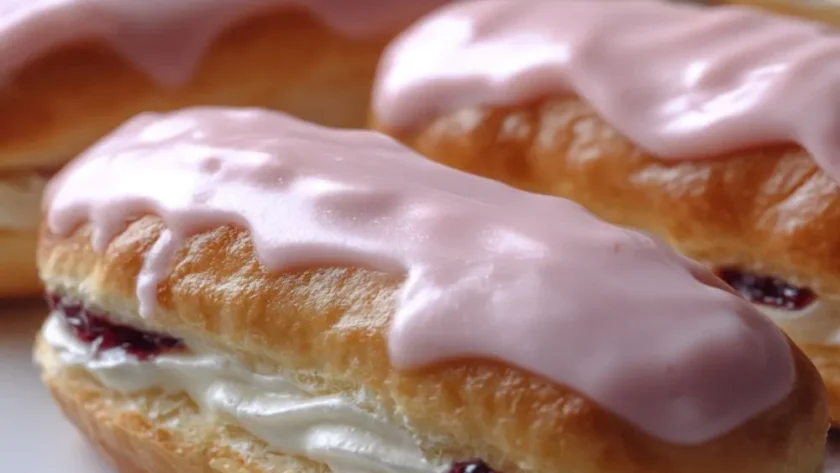
This classic Mary Berry Iced Fingers Recipe creates a soft and pillowy British bakery staple, which uses an enriched yeast dough and a classic combination of strawberry jam and whipped cream. It is a nostalgic tea-time treat, perfect for weekend baking projects or summer picnics.
Jump to RecipeMary Berry Iced Fingers Ingredients
The Enriched Dough:
- 500g Strong White Flour: The high protein content gives the buns their structure and chew.
- 40g Caster Sugar: Adds a subtle sweetness to the dough itself.
- 40g Unsalted Butter, softened: Enriches the dough for a tender crumb.
- 2 x 7g sachets Fast-Action Dried Yeast: Ensures a good rise for airy buns.
- 2 teaspoons Salt: Balances the flavor (keep away from direct contact with yeast when mixing).
- 2 Large Eggs: Provides richness and color.
- 300ml Milk, warmed: The liquid base; needs to be lukewarm (not hot) to activate the yeast.
The Filling:
- Strawberry or Raspberry Jam: For the fruity base layer.
- 300ml Double Cream (Heavy Cream): Whipped until stiff to fill the buns.
The Icing:
- 200g Icing Sugar (Confectioners’ Sugar): The base for the glaze.
- Water: To mix (about 2-3 tablespoons).
- Pink Food Coloring (optional): For the traditional bakery look.

How To Make Mary Berry Iced Fingers
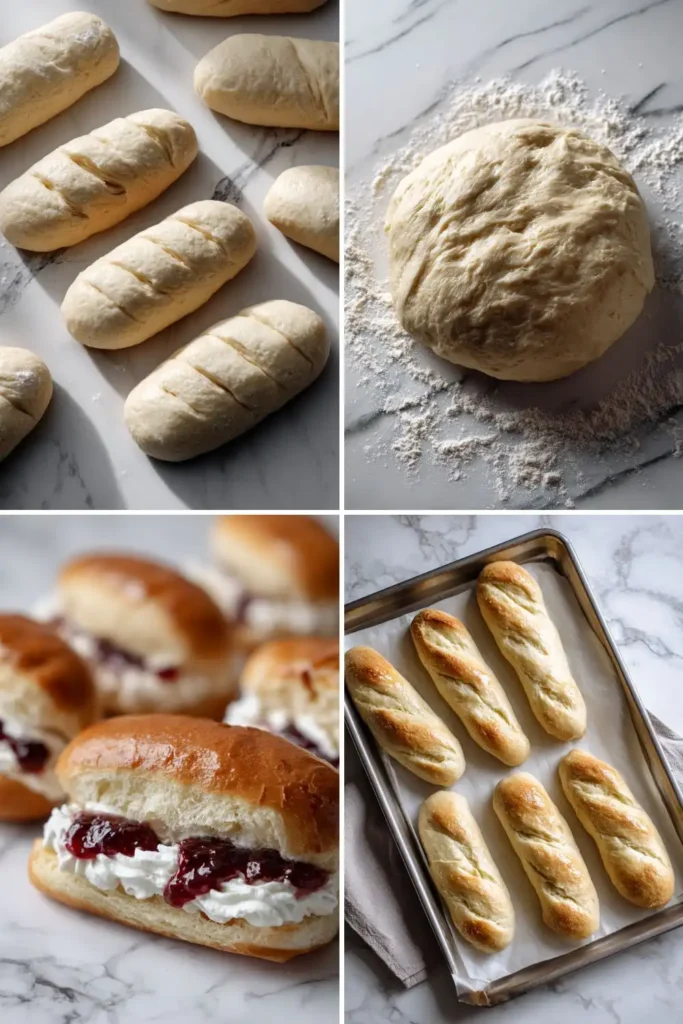
- Make the Dough: Place the flour, sugar, yeast, and salt into a large bowl (keep salt and yeast on opposite sides). Add the softened butter, eggs, and warm milk. Mix together to form a soft dough.
- Knead: Turn the dough onto a lightly floured surface and knead for 10 minutes until smooth and elastic. Alternatively, use a stand mixer with a dough hook for 5-7 minutes.
- First Rise: Place the dough in a lightly oiled bowl, cover with cling film, and leave in a warm place to rise for about 1 hour, or until doubled in size.
- Shape: Turn the dough out and divide it into 12 equal pieces (weighing them helps). Roll each piece into a sausage shape, about 5 inches (12cm) long.
- Second Rise: Place the shaped fingers on a greased or lined baking sheet, spacing them slightly apart so they can grow. Cover and prove for another 30-40 minutes until puffed up.
- Bake: Preheat the oven to 220°C (200°C Fan / 425°F). Bake the buns for 10 minutes until pale golden.
- Cool: Transfer to a wire rack to cool completely.
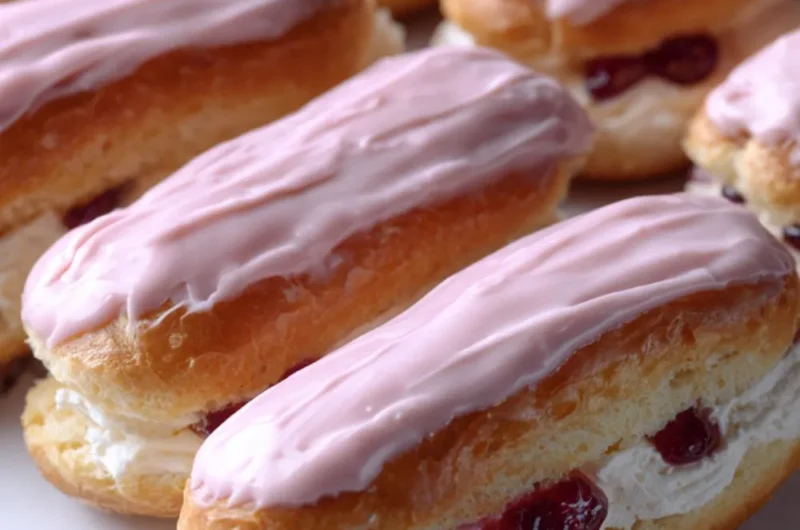
- Ice: Sift the icing sugar into a bowl and gradually stir in enough water to make a thick paste. Add coloring if using. Dip the top of each cooled bun into the icing (or spread with a knife) and let set.
- Fill: Once the icing is set, slice the buns horizontally (not all the way through). Spread the bottom with jam and pipe whipped cream on top.
Recipe Tips
- The “Windowpane” Test: To ensure your dough is kneaded enough, stretch a small piece between your fingers. It should stretch thin enough to let light through without tearing. If it tears immediately, keep kneading.
- Don’t Overheat the Milk: If your milk is too hot, it will kill the yeast and your buns won’t rise. It should feel tepid—like comfortable bath water.
- Sticky Dough is Good: Enriched doughs can be sticky. Resist the urge to add too much extra flour during kneading, as this will make the buns tough and dry. Use a dough scraper to handle it.
- Icing Consistency: The icing should be thick enough to coat the bun without running down the sides immediately, but thin enough to smooth itself out.
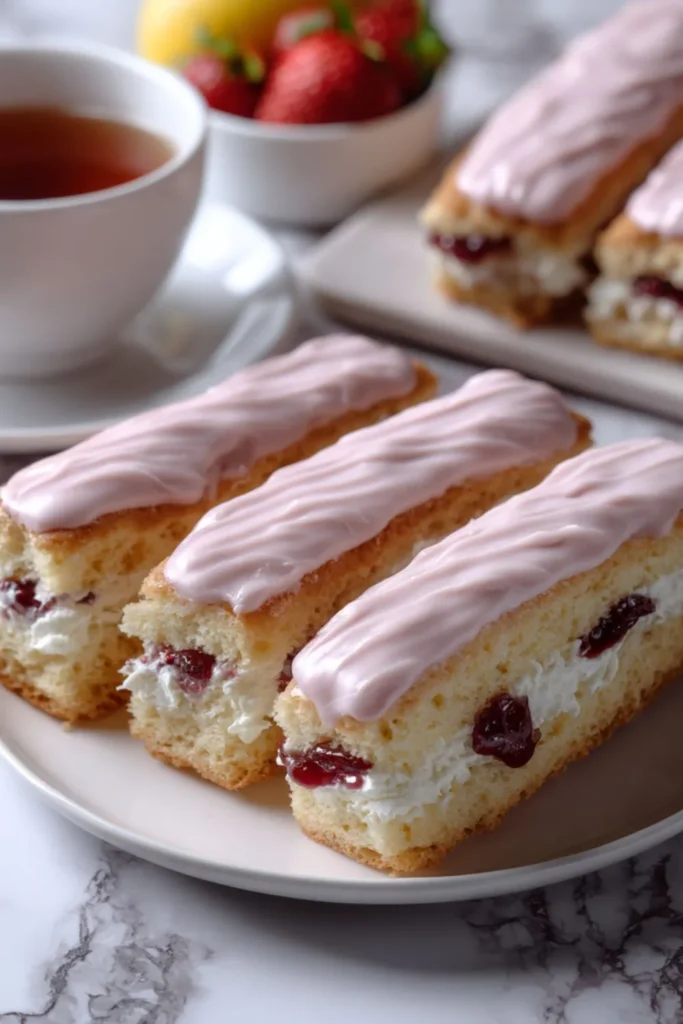
What To Serve With Mary Berry Iced Fingers
- English Breakfast Tea: The ultimate pairing for a British bun.
- Fresh Strawberries: Serve on the side to echo the jam filling.
- Lemonade: A refreshing contrast for a summer snack.
- Clotted Cream: For an extra indulgent twist, swap whipped cream for clotted cream.
How To Store Mary Berry Iced Fingers
- Refrigerate: Because these contain fresh whipped cream, they must be stored in the refrigerator if not eaten immediately. They are best consumed within 24 hours.
- Freezing: You can freeze the baked buns before filling and icing. Wrap tight and freeze for up to 1 month. Thaw, refresh in the oven briefly, then ice and fill.
Mary Berry Iced Fingers Nutrition Facts
- Calories: 320 kcal
- Carbohydrates: 45g
- Fat: 14g
- Protein: 6g
- Sugar: 20g
Nutrition information is estimated per filled bun.
FAQs
Can I use plain flour?
No, you really need Strong White Bread Flour. The higher gluten content is necessary to support the rise and create that chewy, bread-like texture rather than a cakey texture.
Why did my buns wrinkle after baking?
This often happens if they were over-proofed (left to rise too long) or if they cooled down too quickly in a drafty kitchen.
Can I bake these touching each other?
Yes! In fact, traditional iced fingers often touch in the oven, creating soft u0022tear-and-shareu0022 sides rather than crusty edges.
Try More Recipes:
- Mary Berry Spiced Orange Cake Recipe
- Mary Berry Old School Traybake Cake Recipe
- Mary Berry Pineapple Fruit Cake Recipe
Mary Berry Iced Fingers Recipe
Course: DessertCuisine: BritishDifficulty: Easy12
servings30
minutes1
hour30
minutes320
kcalA classic British teatime treat featuring soft, enriched dough fingers topped with sweet icing and filled with jam and fresh cream.
Ingredients
500g strong white flour
40g sugar
40g butter, softened
2 sachets (14g) fast-action yeast
2 tsp salt
2 eggs
300ml warm milk
200g icing sugar
Jam and Double Cream for filling
Directions
- Mix flour, sugar, salt, yeast, butter, eggs, and warm milk to form a dough.
- Knead for 10 minutes until elastic.
- Let rise for 1 hour until doubled.
- Divide into 12, shape into fingers, and rise again for 30 mins.
- Bake at 220°C for 10 minutes.
- Cool completely.
- Dip tops in thick icing.
- Slice and fill with jam and whipped cream.
Notes
- Weigh dough pieces for uniform baking.
- Keep salt away from yeast when mixing.
- Best eaten fresh on the day made.